How Do I Upload My Csv to Salesforce?
In this postal service, you will learn how to upload data into Salesforce by ii methods. In the commencement method, you lot volition exist setting up the Salesforce Data Import functionality using the dataloader.io tool. Dataloader.io is a elementary still powerful spider web-based tool provided by Salesforce for complimentary. It makes it possible to insert, update, delete or export Salesforce records. When importing information, Dataloader reads, extracts, and loads data from comma-separated values (CSV) files or a database connection. When exporting data, it outputs CSV files. In the second method, you will utilise Hevo Activate for Salesforce Information Import.
In this post, you will explore how to upload information into Salesforce, such as contact data as follows:
- Object: Contacts
- Fields: First Name, Concluding Proper name, Address, City, Canton, State, Zip, Phone Number, Email Address
- Operation: Upsert
You will apply the Upsert functioning which means that yous volition either create a new record or update an existing one. Past the stop of this mail, you will be in the position to employ the Dataloader Wizard to import information for any standard Salesforce object, such as Accounts, Contacts, Leads, Solutions, and Campaign members. You will too enable notifications so that when the import is completed, you will receive an email report.
Lastly, you will connect Dataloader to your PC and schedule daily imports so that the CSV file with the Contact records is imported into your Salesforce case automatically. When updating records, you will use electronic mail to look up already existing records that take the same email and update this information. Let's get insights into both methods in the farther sections.
Table of Contents
- Prerequisites
- What is Salesforce?
- Salesforce Tools to Perform Salesforce Data Import
- Data Import Wizard
- Information Loader
- Methods to Prepare Salesforce Data Import
- Method ane: Salesforce Information Import Using Dataloader.io Tool
- Step one: Install Dataloader.io from Salesforce AppExchange
- Step 2: Create an Import Task
- Footstep 3: Select your Connection, Operation, and Object
- Step 4: Upload your File
- Step 5: Define the Mapping of your Fields
- Footstep half-dozen: Schedule Daily Updates and Email Notifications
- Step 7: Salvage and Run Your Task
- Method 2: Salesforce Data Import Using Hevo Activate
- Method ane: Salesforce Information Import Using Dataloader.io Tool
- What are the Common Salesforce Information Uploading Challenges?
- FAQs
- Conclusion
Prerequisites
You volition have a much easier fourth dimension agreement the Salesforce Data Import if you accept gone through the following aspects:
- Access to a PC with Chrome, Firefox, or Safari.
- An active Salesforce account.
What is Salesforce?
Salesforce is 1 of the most widely used CRM platforms, and its popularity has risen dramatically in recent years. It's a Cloud platform that provides customers with a better experience and more consummate concern apps for communicating with other Customers, Prospects, Partners, Sales, and Marketing services beyond the world. It may too be used to plan and track Sales and Marketing efforts, also as manage your services by analyzing your data.
Salesforce also offers several additional Salesforce Products, such as Sales Cloud, Marketing Cloud, Salesforce Analytics, Process Automation, and and then on. Salesforce's Customer 360 Platform guarantees a tailored experience. Salesforce's API allows users to access data and migrate data from other systems by connecting using Java Database Connectivity (JDBC).
You tin use the following Salesforce built tools, to perform the Salesforce Information Import:
- Data Import Wizard
- Data Loader
1) Data Import Wizard
The Data Import Wizard tool allows you to import data from both standard and custom objects, such as contacts, leads, and accounts. It has the ability to import upwardly to fifty,000 records at once. It has a uncomplicated UI for configuring the parameters, data sources, and field mappings, which interpret the field names in your import file to Salesforce field names. Refer to the Salesforce Data Import – Data Import Magician Documentation to know more about the Data Import Wizard.
Information Import Sorcerer Permissions Required for Salesforce Data Import:
- Import Personal Contacts: Yous may apply this permission to import your ain accounts and contacts.
- Modify All Data: You may apply this permission to import other people's accounts and contacts.
- Import Leads: You may use this permission to import leads.
- Import Custom Objects & Create on the custom object: You may use this permission to import custom object information.
Refer to the Salesforce Data Import Wizard Permissions to know nearly the other permissions required by the Information Import Wizard.
2) Data Loader
Information Loader is a client application that allows you to load large amounts of data and execute DML statements on Salesforce data. It tin can import upward to 5 one thousand thousand records of any data type from files or a database connection at 1 time. It can be controlled using a graphical user interface or a command line. In the latter situation, you must use configuration files to ascertain data sources, field mappings, and other settings. This allows you to employ API calls to automate the import process. Information technology leverages Soap API for processing records. However, you lot tin also utilise the Bulk API for larger load and parallel processing.
Data Loader Permissions Required for Salesforce Data Import:
- Read, Create, Edit, and Delete on the objects.
- API Enabled.
- Bulk API Hard Delete (when you configure to utilize Bulk API for hard deleting records).
Refer to the Salesforce Information Import – Data Loader Documentation to know more about Data Loader.
Method ane: Salesforce Data Import Using Dataloader.io Tool
This method involves setting up Salesforce Data Import manually by using the dataloader.io tool. It is a simple however powerful web-based tool provided past Salesforce for complimentary. While importing information using this method, the dataloader reads, extracts, and loads data from comma-separated values (CSV) files or a database connectedness. When exporting data, it outputs the CSV files.
Method 2: Salesforce Data Import Using Hevo Activate
Hevo Activate is a completely managed cloud-based ETL tool that can load information to multiple applications such as Salesforce from your Data Warehouse and other data sources for gratuitous. Hevo Activate provides an easy-to-use interface that can achieve such load jobs in a matter of few clicks. It can transform data on the fly and facilitate recurring jobs to load data to Salesforce.
Hevo Activate is fully managed and completely automates the process of not simply loading data from your desired source but also enriching the information and transforming it into an assay-ready form without having to write a single line of lawmaking. Hevo's pre-built integration with diverse data sources such as Salesforce, Google BigQuery, Amazon Redshift, Snowflake, HubSpot, etc., will take total accuse of the data transfer process, allowing you to focus on cardinal business activities.
Get Started with Hevo for Costless
Methods to Fix up Salesforce Data Import
Users can set up Salesforce Data Import by implementing one of the following methods:
- Method 1: Salesforce Data Import Using Dataloader.io Tool
- Method 2: Salesforce Data Import Using Hevo Actuate
Method 1: Salesforce Data Import Using Dataloader.io Tool
Salesforce allows users to leverage the Salesforce Data Import functionality to load data in the CSV format from a source of their choice. You can learn more than about how to upload information into Salesforce using the Salesforce Data Import functionality from the following steps:
- Step 1: Install Dataloader.io from Salesforce AppExchange
- Step two: Create an Import Task
- Footstep 3: Select your Connection, Operation, and Object
- Step 4: Upload your File
- Step 5: Define the Mapping of your Fields
- Stride 6: Schedule Daily Updates and Email Notifications
- Stride vii: Salve and Run Your Task.
Step 1: Install Dataloader.io from Salesforce AppExchage
- Log in with Salesforce. Use your existing Salesforce credentials to log into AppExchange.
- Search for dataloader.io in the search bar.
- Alternatively, you can directly observe the App using the following link: https://appexchange.salesforce.com/appxListingDetail?listingId=a0N30000009w8ZBEAY
- Install dataloader.io for free and cosign using your Salesforce credentials. Dataloader uses OAuth 2.0 which means no sign-up or security tokens are required.
- Select the environment you want to access and click Login.
- When starting time logged in, you will come across a Getting Started page. On the height of the screen, yous will see New Task. This is the starting signal to import, export, and delete data in Salesforce.
Step 2: Create an Import Task
The first footstep to load data into Salesforce using Salesforce Data Import is to create an Import Task. Import Tasks are reusable such that the adjacent fourth dimension you want to import the same kind of data, you tin reuse a job that yous've already created and it will only have you ane click to get it upwardly. Dataloader.io will also let you to schedule import/upload tasks to run automatically at the designated times.
To create an Import Task:
- Click New Task on the top bill of fare bar
- Then select Import
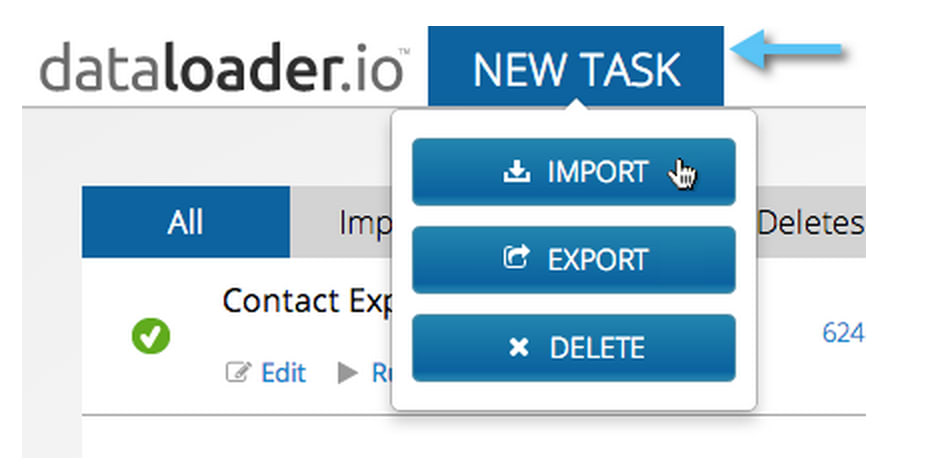
This is how y'all tin create an import task to start setting upward the Salesforce Information Import.
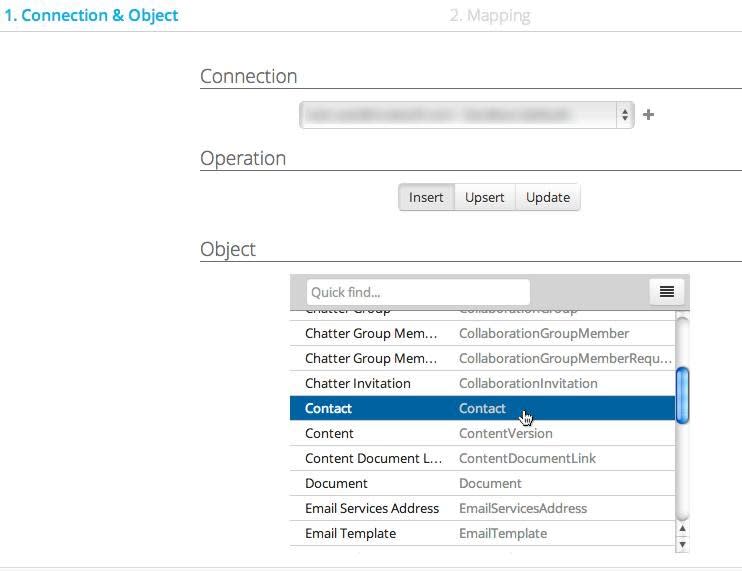
Pace 3: Select your Connexion, Operation, and Object
- Select the Salesforce connectedness from the dropdown bill of fare.
- Select Upsert operation to create new records and update existing ones.
- Select Contact as the object type you wish to import data into.
- Click Side by side.
Step 4: Upload your File
- Download the sample CSV file from this link: https://letterhub.com/wp-content/uploads/2018/03/50-contacts.csv
- To upload a CSV file, click on the Upload CSV button to select the file from your calculator or drag and drop your file within the import wizard. Y'all tin import files from your PC, Dropbox account, FTP, or SFTP connection.
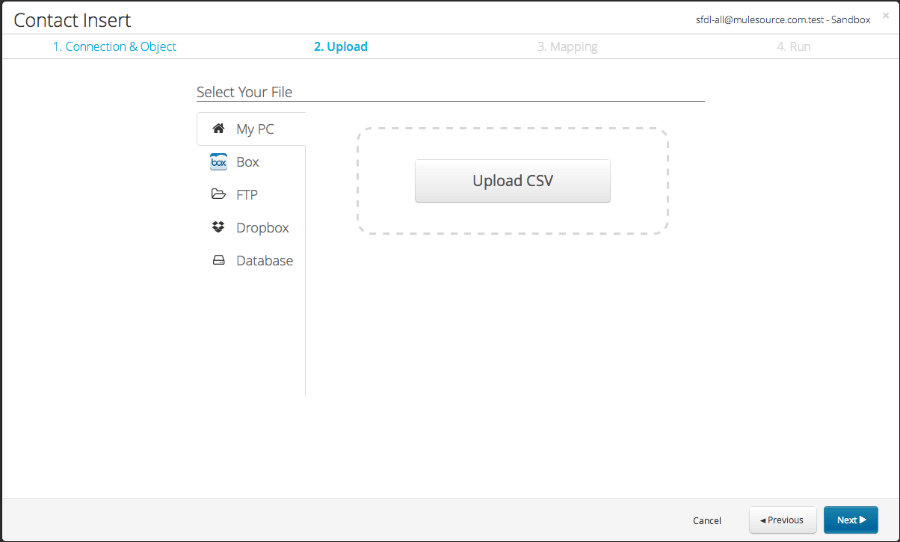
This is how you can import your desired CSV file from a source of your choice to Salesforce using the Salesforce Data Import functionality.
Step 5: Define the Mapping of your Fields
- The next step is to map your CSV columns to your Salesforce fields. As you can run across from the window, Dataloader has automatically matched some headers from your input file.
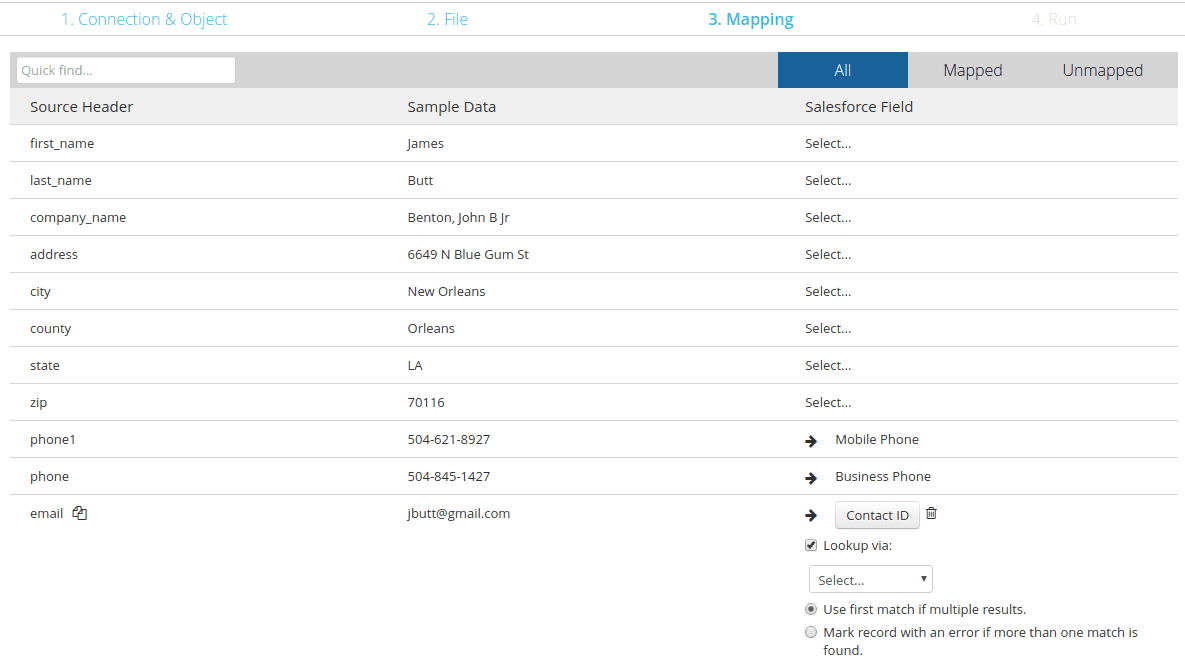
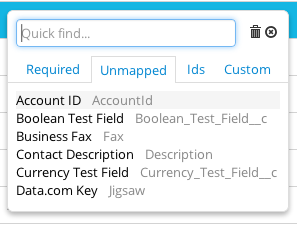
- Apply the quick filters on the peak right to see all, mapped or unmapped fields from salesforce and speedily notice if you are missing some important attributes.
- To delete a mapping, click on the trash can next to the mapped Salesforce field. When doing inserts brand sure you accept mapped all the required fields, otherwise, y'all won't be able to move forward.
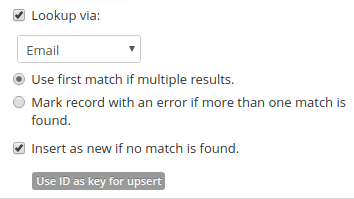
- Modify Electronic mail to map to a Contact ID.
- Select Lookup via Email.
- Select Insert as new if no match is found.
- Click Next.
Step 6: Schedule Daily Updates and Email Notifications
On the next page, you will see a summary of the Import Task yous just created.
- Add together a daily schedule then that Dataloader will run this task every twenty-four hours importing the CSV file into Salesforce with the mapping configuration you just defined.
- Select Utilize Majority API because it'south much faster. Still, annotation that this characteristic is not available for Lightning users in which case, just stick to the Lather API.
- Bank check the Send me the results via east-mail choice.
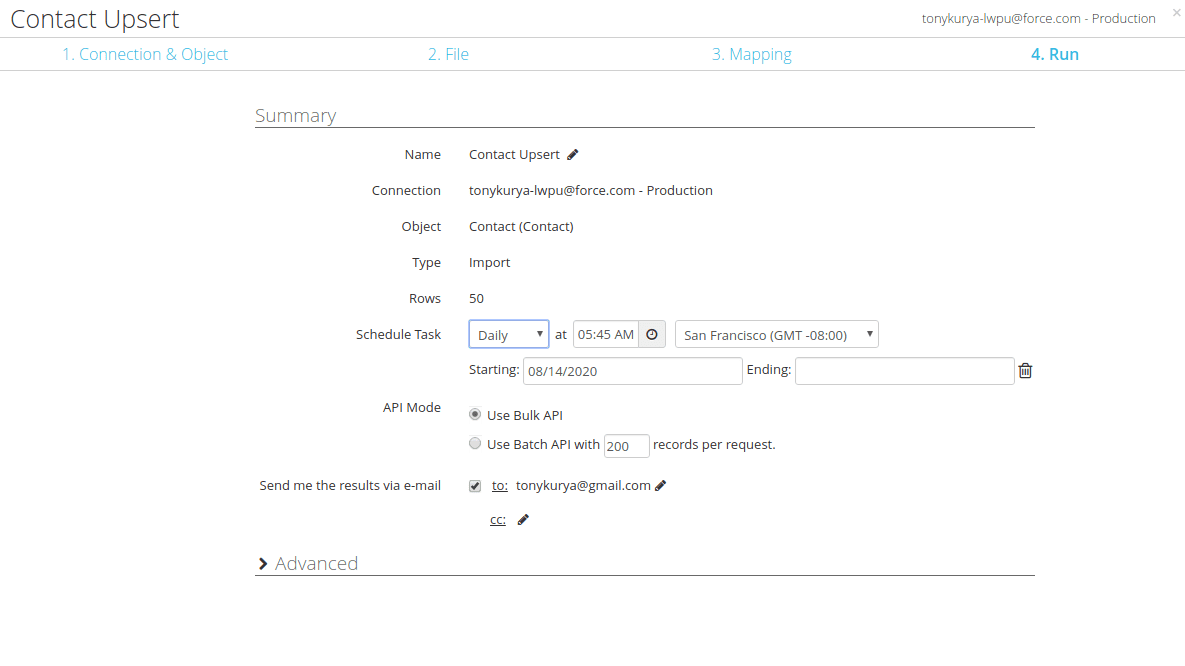
Footstep 7: Salve and Run Your Task.
Finally, on the last step of the setup wizard, click Save to save your chore and run it later or click Save and Run to save your task and run it immediately.
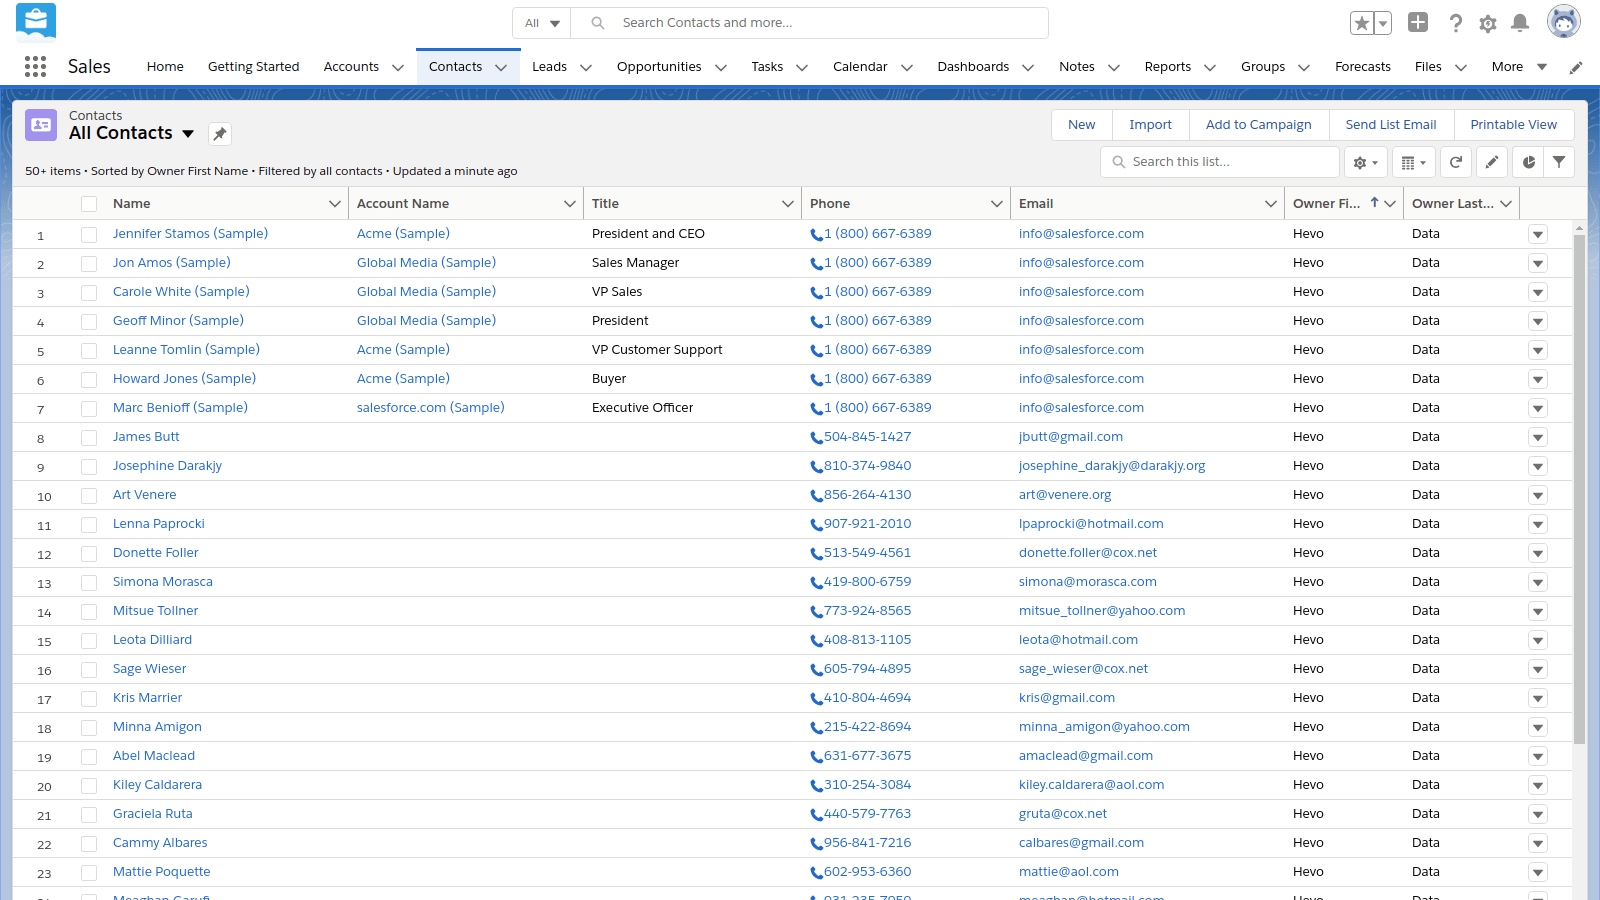
Cheque your Salesforce.com business relationship to run into whether the contacts accept been updated. You should view something similar to this:
This completes your pace-by-step tutorial on how to upload data into Salesforce using the Salesforce Data Import functionality.
Method 2: Salesforce Information Import Using Hevo Activate

Hevo Activate is a completely managed cloud-based ETL tool that can load data to multiple applications from databases and data sources including Salesforce. Hevo Activate provides an easy-to-employ interface that can attain such load jobs in a thing of few clicks. It can transform information on the fly and facilitate recurring jobs to load data to Salesforce.
Hevo Activate takes care of all your information pre-processing needs and lets you focus on key business concern activities and depict a much powerful insight on how to generate more than leads, retain customers, and take your concern to new heights of profitability. It provides a consistent & reliable solution to manage data in existent-time and e'er have analysis-ready data in your desired destination.
Check out what makes Hevo Activate amazing:
- Real-Time Data Transfer:Hevo Activate with its strong integration with 100+ sources, allows you to transfer data chop-chop & efficiently. This ensures efficient utilization of bandwidth on both ends.
- Data Transformation: It provides a unproblematic interface to perfect, change, and enrich the data you want to transfer.
- Secure: Hevo Activate has a fault-tolerant architecture that ensures that the data is handled in a secure, consequent manner with zippo data loss.
- Tremendous Connector Availability: Hevo Activate houses a large variety of connectors and lets yous bring in data from numerous marketing & SaaS applications, databases, etc. such as Airflow, Hubspot, Marketo, MongoDB, Oracle, Salesforce, Redshift, etc. in an integrated and assay-ready form.
- Simplicity: Using Hevo Actuate is easy and intuitive, ensuring that your data is exported in only a few clicks.
- Completely Managed Platform:Hevo Activate is fully managed. You need non invest time and effort to maintain or monitor the infrastructure involved in executing codes.
- Live Back up: The Hevo Activate team is available circular the clock to extend exceptional back up to its customers through chat, electronic mail, and support calls.
Sign up here for a 14-Day Gratuitous Trial!
What are the Mutual Salesforce Data Uploading Challenges?
While performing Salesforce information upload, cleaning, migrating, and integrating it with other data properly are some of the disquisitional steps that are oft overlooked. If these stages, which all need information loading, are not correctly planned for, they might issue in unanticipated expenses and longer implementation deadlines. Some of the frequent challenges that arise when these processes are not fairly planned are:
- Dirty Information: Clean data is critical whether a client is upgrading their CRM, deploying a new CRM, or integrating several Salesforce instances. Since CRM is oft considered equally the source of truth, yous should avoid importing data that is missing, inconsistent, or duplicated.
- Complex Data Transformations: Circuitous information transformations are common while going through an ERP and API integration or data migration. Information technology will be impossible to place the suitable technologies to utilise or plan out the required resources, deadlines, and budget for this work without first examining the intricacies of the information you are transferring.
- Manual vs Automated Data Loading Conclusion: Setting up your CRM and ensuring that all of the data that has to travel in and out of your CRM are the principal challenges You should determine if you want to automate the connections between Salesforce and the other systems while you're designing your Salesforce setup. A few principal advantages of automated data loading are reduced transmission mistakes, increased staff efficiency and performance.
Equally you can run into from the challenges listed above, in order to ensure a successful Salesforce Data Upload, you must program out the data loading stages and ensure you have the necessary tools.
FAQs
1) How to friction match the Salesforce fields to your information for mapping while uploading?
When you import accounts and contacts for an organization or individual information from sources other than Outlook or Human activity, the Import Wizards map the fields as accurately as possible. Before y'all can stop the import, you must fine-tune the mapping. Salesforce recommends that y'all label the columns in your import file in Excel before importing your data.
When inserting, deleting, or updating files, employ the Mapping Dialog window to map Salesforce fields to CSV file columns.
- To match fields to columns automatically, select the " Auto-Match Fields to Columns " option. Based on the similarity of field and column names, the Data Loader populates the list at the bottom of the window. Automated matching simply works on the ID field during a delete performance.
- Click and drag fields from the list of Salesforce fields at the height to the listing of CSV column header names at the bottom to manually friction match fields with columns. For instance, if you're inserting new Account records and your CSV file contains the names of new accounts, drag the Name field to the right of the Name column header field.
- Click the " Save Mapping " button if you want to salve this mapping for subsequently use (optional). Requite the SDL mapping file a name. If you lot choose an existing file, the export will supercede its contents. Click the " Yep " button to ostend the action, or the " No " push to select another file.
- To use your mapping for the current operation, click the " OK " push button.
ii) Which Salesforce users tin upload data?
For importing data using Data Import Magician, you need to accept these permissions:
- Import Personal Contacts: You may employ this permission to import your own accounts and contacts.
- Modify All Data: You may apply this permission to import other people's accounts and contacts.
- Import Leads: Y'all may use this permission to import leads.
- Import Custom Objects & Create on the custom object: You may use this permission to import custom object data.
For importing data using Data Loader, you need to have these permissions:
- Read, Create, Edit, and Delete on the objects.
- API Enabled.
- Majority API Hard Delete (when you configure to use Majority API for hard deleting records).
Decision
We hope this helps you get up and running quickly with uploading CSV records to Salesforce and then that you can manage customer interactions much better. Since you're here, you can hands upload records to Salesforce using Hevo Activate.
Hevo Actuate helps you directly transfer data from a source of your choice such as a data warehouse to any SaaS application, CRMs such as Salesforce, etc. for free in a fully automated and secure manner without having to write the lawmaking repeatedly. Hevo Activate with its strong integration with 100+ data sources & BI tools, allows you to non merely export & load data but also transform & enrich your data & make it analysis-prepare in a jiffy, at a reasonable price. You can automate your data flow to Salesforce in minutes.
Visit our Website to Explore Hevo
Sign Up for a 14-day costless trial today and permit Hevo Actuate exist a helping hand in your data upload process.
Exercise share your experience of learning about Salesforce Data Import with us in the comments department below!
Source: https://hevodata.com/learn/salesforce-data-import/#:~:text=To%20upload%20a%20CSV%20file,%2C%20FTP%2C%20or%20SFTP%20connection.
Post a Comment for "How Do I Upload My Csv to Salesforce?"